SATUSEHAT DICOM Router: Windows & Docker Install Guide
Technical guide to the SATUSEHAT DICOM Router: connecting radiology modalities to the NIDR via the Windows installer or Docker Compose, with field-tested error fixes.
Quick answer
What to know before reading further
- SATUSEHAT receives radiology data through the official Kemkes DICOM Router, available as a Windows Binary Installer (.exe) or a Docker Compose container.
- The software is not distributed via public browser downloads; it must be fetched via an authenticated HTTP GET request using your SATUSEHAT Bearer Token.
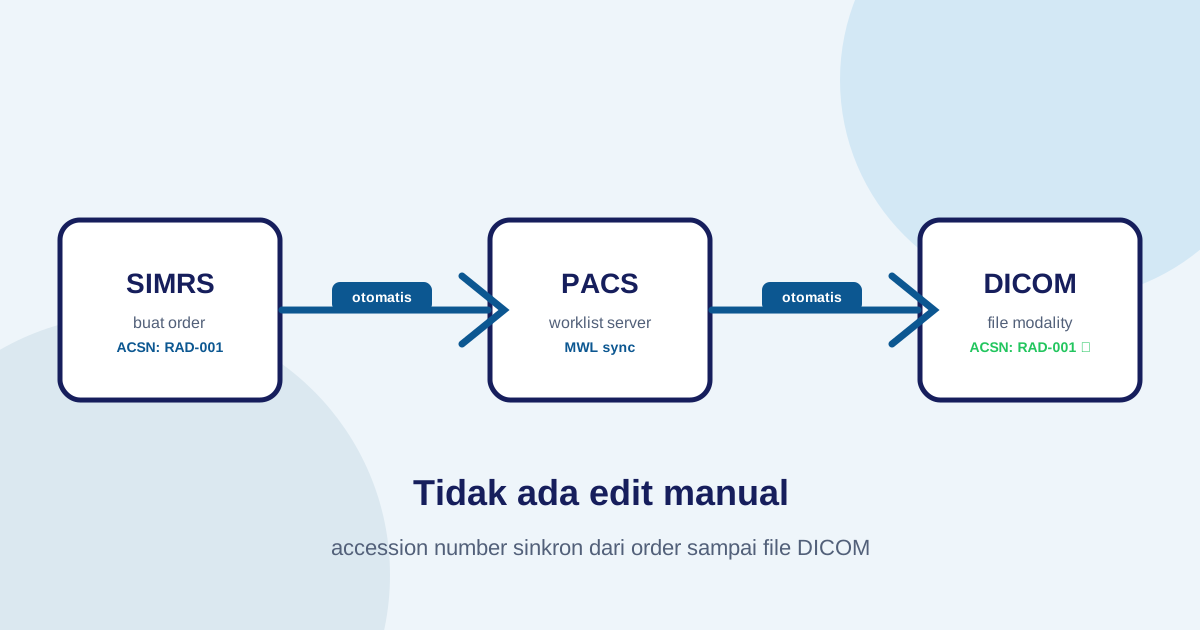
- Most transmission failures stem from sequence errors (sending DICOM before the ServiceRequest) or accession numbers longer than 16 characters.
SATUSEHAT and the Radiology Data Path
SATUSEHAT is the foundation of Indonesia’s national electronic medical record (EMR) system. For facilities across the country — from type C/D clinics to major referral hospitals — the platform sets the standard for exchanging health data with the Ministry of Health.
Radiology holds a special position in the SATUSEHAT ecosystem. Outpatient summaries and pharmacy prescriptions travel as simple JSON payloads, but imaging studies — X-Ray, CT, MRI, Ultrasound — are binary files under the DICOM standard (Digital Imaging and Communications in Medicine) that cannot be submitted through a standard API endpoint.
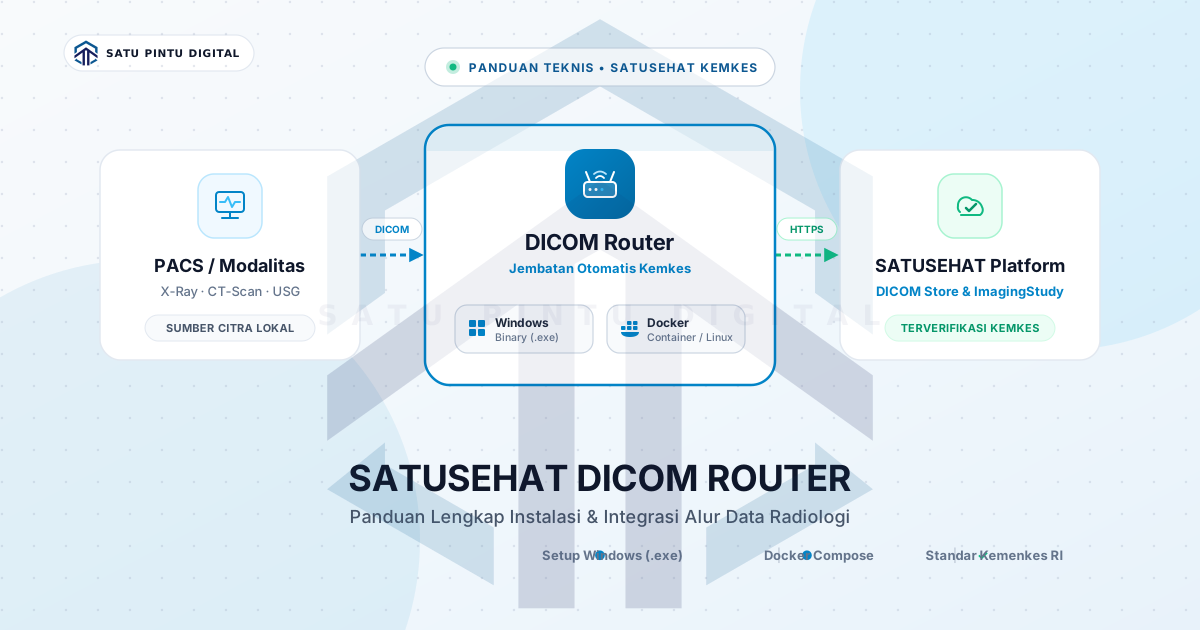
To bridge local imaging equipment or on-premise PACS servers with the National Imaging Data Repository (NIDR), the Ministry of Health provides official middleware known as the DICOM Router.
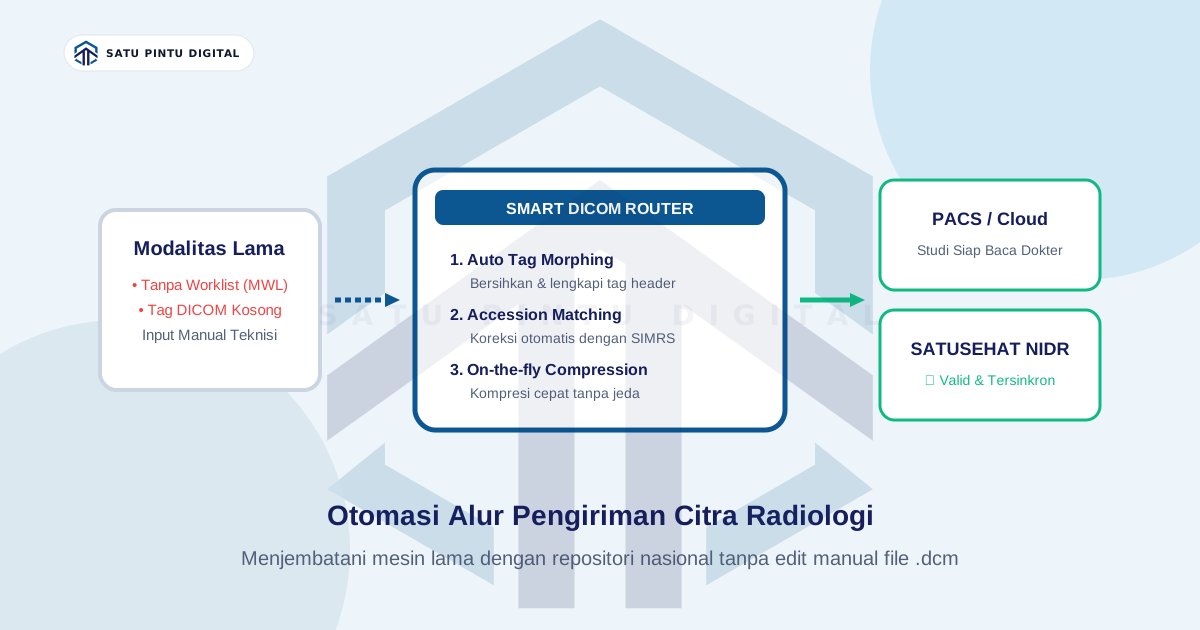
The SATUSEHAT DICOM Router listens as a C-STORE SCP receiver on default port 11112, extracts examination metadata — specifically the Accession Number — matches it against a previously registered ServiceRequest in SATUSEHAT, and forwards the imagery to the NIDR cloud store.
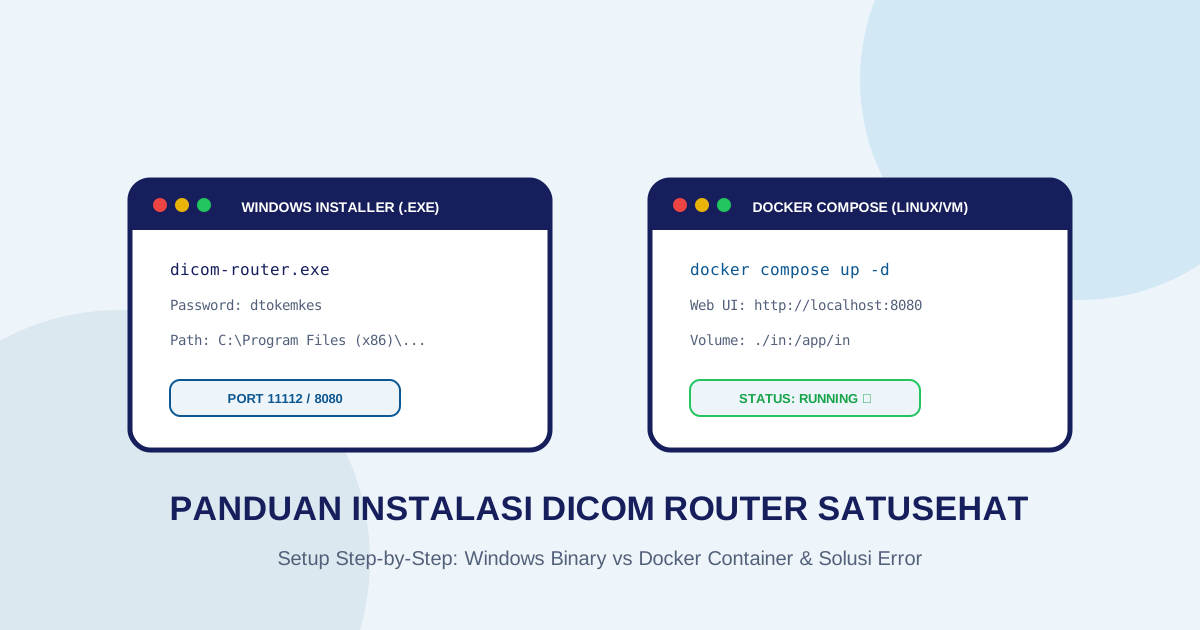
Official documentation provides two deployment pathways: the Windows Binary Installer and Docker Compose for Linux/VMs. This guide walks through both methods step-by-step and covers battle-tested solutions for the five most common technical hurdles encountered in the field.
Prerequisites Before Installation
Before configuring your server, make sure you have prepared the following assets:
- SATUSEHAT API Credentials: Your
Organization ID,Client ID, andClient Secret(retrievable from the SATUSEHAT Platform developer portal for both Sandbox and Production). - Static Network IP: The machine hosting the DICOM Router requires a static local IP address so modalities and local PACS instances can consistently reach it.
- Open Ports: Verify that port
11112(DICOM storage) and port8080(HTTP configuration/API) are accessible through local firewalls and not claimed by competing applications.
Option 1: Windows Installation (Binary Installer)
This approach is commonly chosen by type C and D hospitals or outpatient clinics running a dedicated Windows workstation as their imaging bridge.
Step 1: Downloading the Installer via API
The installer package is not provided via open web browser links. You must perform an authenticated HTTP GET request using Postman, cURL, or an automated script with a valid SATUSEHAT Bearer Token:
- Sandbox:
https://api-satusehat-stg.dto.kemkes.go.id/dicom-router-installer - Production:
https://api-satusehat.kemkes.go.id/dicom-router-installer
Request Header:
Authorization: Bearer <access_token_satusehat>Save the response body as dicom-router.zip and extract its contents.
Step 2: Running the Installer
-
Open the extracted directory, right-click
dicom-router.exe, and select Run as administrator. -
When prompted for the package extraction password, enter the official archive password:
dtokemkes -
Complete the setup wizard. By default, the application installs to:
C:\Program Files (x86)\DICOM Router\
Step 3: Configuring router.conf
Open router.conf inside the installation folder using an elevated text editor (with Administrator privileges). Enter your facility credentials:
[settings]
org_id=100026xxx
client_id=your_client_id_here
client_secret=your_client_secret_here
url=https://api-satusehat.kemkes.go.id
http_port=8080
dicom_port=11112
ae_title=DCMROUTER
Critical Notice: Do not leave whitespace around the equals sign (
=). Formatting lines likeorg_id = 1000xxxfrequently causes silent credential parsing failures in the underlying runtime.
Step 4: Starting the DICOM Router
Launch the application via the desktop shortcut or Start Menu. When running normally, the console displays active listeners on port 11112 for DICOM transactions and port 8080 for internal HTTP coordination.
Option 2: Docker Installation (Linux / VM)
The containerized Docker deployment is recommended for production hospital environments running Linux servers (Ubuntu Server, AlmaLinux, Debian) due to superior process isolation, logging, and restart resilience.
Step 1: Downloading docker-compose.zip
As with the Windows package, retrieve the Docker deployment bundle using an authenticated GET request:
- Sandbox:
https://api-satusehat-stg.dto.kemkes.go.id/dicom-router - Production:
https://api-satusehat.kemkes.go.id/dicom-router
Save the file as docker-compose.zip and extract it on your Linux host:
unzip docker-compose.zip -d dicom-router
cd dicom-router
Step 2: Structure and Configuration of docker-compose.yml
A production-ready docker-compose.yml file is structured as follows:
version: '3.8'
services:
  dicom:
    image: registry.dto.kemkes.go.id/pub/dicom-router:latest
    container_name: dicom-router
    restart: always
    ports:
      - "11112:11112"
      - "8080:8080"
    environment:
      - ORG_ID=100026xxx
      - CLIENT=your_client_id
      - SECRET=your_client_secret
      - URL=https://api-satusehat.kemkes.go.id
      - AE_TITLE=DCMROUTER
    volumes:
      - ./in:/app/in
    networks:
      - dicom-network

networks:
  dicom-network:
    driver: bridge
Step 3: Launching the Container
With Docker Engine and the Compose plugin installed, launch the daemon in detached mode:
docker compose up -dMonitor live runtime logs to ensure initialization is clean:
docker logs -f dicom-routerStep 4: Web UI Configuration
If you prefer not to hardcode credentials into the YAML file, you can configure them via the built-in browser dashboard:
http://<server-ip>:8080/config
Provide your Organization ID, Client ID, and Client Secret, then click Save.
5 Practical Field Pitfalls and How to Fix Them
Drawing from thousands of real-world implementation logs across Indonesian hospitals, these are the most frequent stumbling blocks:
| Issue Symptom | Underlying Root Cause | Battle-Tested Solution |
|---|---|---|
| Windows silent crash / unprocessed files | Windows default 260-character path limit (LongPathsEnabled) | Open regedit → navigate to HKEY_LOCAL_MACHINE\SYSTEM\CurrentControlSet\Control\FileSystem → set LongPathsEnabled to 1, then reboot. |
Error ServiceRequest not found |
The DICOM file was transmitted before the ServiceRequest resource reached SATUSEHAT | Enforce strict sequencing: SIMRS sends ServiceRequest first, stores the Accession Number, and only then triggers DICOM forwarding. |
| Accession Number reading failure | The internal order numbering format exceeds 16 characters | The official Kemkes DICOM Router enforces a strict 16-character maximum. Shorten your facility’s internal accession format accordingly. |
Docker error No such file or directory: /app/in |
The host volume staging folder was not pre-created | Run mkdir -p in in the directory containing docker-compose.yml before running docker compose up. |
| Local server disk capacity exhaustion | Transmitted .dcm files are not purged automatically from /app/in |
Schedule a daily cron job or Windows Task to delete processed files older than 3 days. |
Testing DICOM Routing from PACS or Modalities
Once your SATUSEHAT DICOM Router is active and listening on port 11112:
- Navigate to the DICOM Network settings in your local PACS (such as Orthanc, dcm4chee, or K-PACS).
- Register a new destination entity (DICOM Modality):
- Application Entity (AE) Title:
DCMROUTER - IP Address: IP of the server running the DICOM Router
- Port:
11112
- Application Entity (AE) Title:
- Perform a connectivity verification (C-ECHO / DICOM Ping). Once confirmed, send a sample study containing an Accession Number that has already been registered in SATUSEHAT.
- Verify success by executing a
GET /ImagingStudy?identifier=http://sys-ids.kemkes.go.id/acsn/<Org_ID>|<ACSN>query against the SATUSEHAT API.
The Modern Alternative: Bypassing Local Router Maintenance
Setting up and maintaining a dedicated on-premise DICOM Router requires continuous hardware allocation, port monitoring, disk cleanup routines, and manual patch updates whenever new versions are released.
For healthcare facilities seeking a cleaner, zero-infrastructure path, cloud-native architecture offers an integrated answer:
Imagestro-PACS provides native cloud routing directly into SATUSEHAT without requiring separate DICOM Router installations or on-premise server maintenance. Featuring an integrated web DICOM viewer, automated Modality Worklist (MWL) management, and in-browser Accession Number modification, Imagestro ensures your radiology data connects smoothly to SATUSEHAT with complete regulatory compliance. Start with Imagestro Free Tier or explore the architecture on our Imagestro-PACS solution page.
Key terms
Quick glossary
- SATUSEHAT
- Indonesia's national electronic medical record (EMR) system from the Ministry of Health, which receives and stores facility health data including radiology images in the NIDR.
- DICOM Router
- Official Kemkes middleware that receives DICOM files from PACS or modalities via C-STORE on port 11112 and forwards them to the SATUSEHAT NIDR repository.
- NIDR / DICOM Store
- The national imaging repository operated by the Ministry of Health (officially termed SATUSEHAT DICOM Store in developer documentation) that stores DICOM studies and returns WADO URLs.
- router.conf
- The central configuration file on Windows installations storing organization ID, client credentials, the SATUSEHAT endpoint URL, and communication ports.
Read the sources
References and documentation
- SATUSEHAT Platform DICOM System Official Ministry of Health documentation on digital medical imaging standards and DICOM archiving.
- SATUSEHAT DICOM Architecture Architecture guide covering modality workflows, local PACS, ServiceRequest resources, and C-STORE events.
- SATUSEHAT DICOM Router Documentation Middleware specifications for DICOM Router, MWL integration, transmission to DICOM Store, and WADO URLs.
Frequently asked
Questions teams ask before implementation
- How does SATUSEHAT receive DICOM files from a facility?
- SATUSEHAT does not accept DICOM files directly from modalities. Facilities install the official Kemkes DICOM Router, which acts as a C-STORE SCP receiver on port 11112, matches the Accession Number against a ServiceRequest already registered in SATUSEHAT, and forwards the images to the NIDR.
- Why can't the DICOM Router installer be downloaded directly from a web browser?
- The Ministry of Health restricts router distribution to authorized healthcare institutions. Downloads require an authenticated HTTP GET request using an active SATUSEHAT Bearer Token generated from your facility credentials.
- What is the archive extraction password for the Windows DICOM Router installer?
- The official extraction password for the dicom-router.exe archive package provided by DTO Kemkes is "dtokemkes" (without quotes). Operational facility credentials (Organization ID, Client ID, Secret) are confidential and must be secured by each institution.
- When does SATUSEHAT begin accepting DICOM files after router installation?
- SATUSEHAT only processes DICOM files when a ServiceRequest with a matching Accession Number has been submitted and registered first. The required sequence is: SIMRS sends the ServiceRequest, records the Accession Number, and only then forwards the DICOM file to the router.
Transmit Radiology to SATUSEHAT Without the Setup Hassle
Connect your clinical imaging workflow—from modality worklists and automated accession numbers to web DICOM viewing and SATUSEHAT synchronization. Free Tier available for clinics and hospitals.
Content cluster